Monday, 24th February 2025.

Posted on Tuesday, 7th May 2013 by Michael

My first introduction to the Raspberry PI

Many of you know me for my addiction to microcontrollers and creating some pretty cool projects. In the past I have focused solely on the Arduino microcontroller but recently with all the hype I been reading I had to get my hands on the Raspberry PI.

I got to say when they first came out I wanted to get one ASAP, but the waiting list was months long and by the time I got the email that mine were ready to ship the projects I had in mind were already done. I wanted to be the first to create an open source version of the famous pwn plugs as well as design an ata / pbx for it. Since I missed being first on those I gave up on it for a bit. Though recently I have found new need for them again and took the dive ordering 3 of them.

This article is the first of 3 that will detail the projects I complete with the Pi.

The first project was more to fill a need. Years ago I have a media player in the bedroom but over time it died and I could not justify spending tons on a new one.  Then I stumbled on a XMBC for the Raspberry Pi. After reading over it for a bit it was clear that this would be a perfect low cost solution to adding a media server to my home again.

At the current time of writing this there are 3 main XMBC ports for the Rasberry Pi, RaspXMBC, OpenElec and Xbian. I am not going to go into much detail about the operating system and process of making the image. I cover that in my Raspberry PI intro class and there is plenty of info online on how to do it. The website says for newer people to go with the RaspXBMC, but on the day I was working on this project their site was down so I went with OpenElec. The process to download and create the SD card was simple and quick. In a matter of minutes I had it done and was ready for the first boot.

The boot process felt like it was taking forever but in all theory it probably took less than a minute, once loaded it was time to configure the settings. To do this you will need to navigate through the system settings setting up your network settings, time zone, weather, where to pull images from, network shares where your media is stored and so on. This was probably the most time consuming part of the project. Once this was done I decided to watch my first movie through it to test streaming wireless HD on the device.

The video ran near perfect with very little noticeable lag or jitter. There were probably less than 3 instances that were barely noticeable during the whole movie. The only issue was I was tethered to a mouse while in bed.  This had to be corrected before I could see this being a perfect replacement for a commercial bought media player.

To resolve the mouse issue I made use of the onboard GPIO pins. This is where the Raspberry Pi really shines in my book. Not only is this a great mini CPU running Linux, it also gives me the ability to interact with the physical world through sensors like the Arduino does. I decided to build an infrared receiver circuit and use the onboard GPIO to tie it into the Raspberry Pi. This has been done a 100 different ways online and each person has their own spin on it. So I will tell you the simplest way to do this saving yourself hours of wondering and reading. Note that I am not saying my way is the absolute or fully correct way but after several days of testing it works and does what I need.

You will need the following parts:

  1. A decent IR Sensor.  Avoid a Chinese knock off here as it could cause inconsistent reading.  (Side note, nothing against the Chinese parts. Most of the electronics are made there and 9 out of 10 times I order from there, it is just with this project I found the 3.00 one at radio shack to work better than the 5 for a dollar eBay special.)
  2. A decent remote control. This can be any old remote you no longer are using.
  3. 3 x male to female jumper cables.
  4. Mini bread board
  5. And some time.

Read the rest of this entry…

Posted in Papers | Comments (0)

Posted on Wednesday, 10th April 2013 by Michael

The CCDC is one event I look forward to each year. The event allows me to give back to the community as well as have some fun.  During this years event there are several key areas I am looking forward to.

  1. Cisco Firewalls: Did you learn your lesson from last year?
  2. Web Applications: Firewalls don’t protect public facing sites and if you block it then no one can get there.
  3. Ham Radio: Public ability to monitor conversations. Not allowed to be cryptic on the air waves. You might want to learn Morse code.
  4. Badges: What can I say Larry and Darren got some mad ninja skills in designing this section of the contest.

Remember your plan and that when you mess up the CIO will be waiting for you, though this year i am guessing it would be the 5 star general or something along those lines.

You all there.

Posted in CCDC | Comments (1)

Posted on Wednesday, 20th February 2013 by Michael

Instant Bro. Create a bro in minutes! (Bro IDS)

I am freshly back from the 2013 Shmoocon and had the privilege to attend a very interesting and informative talk by  Liam Randall @Hectaman on the Bro IDS system. To download his talk follow this URL: https://github.com/LiamRandall/bro-scripts/tree/master/talks-and-training

What is Bro IDS?

“Bro is a powerful network analysis framework that is much different from the typical IDS you may know” – www.bro-ids.org

After his talk I wanted to learn more about and install it in my organization to see how it performs. I started with the documentation located here: http://www.bro-ids.org/documentation/index.html and went through the installation and quick start guide. Once you get through those two guides you are basically up and running capturing traffic and logging.

Since this took some time and I wanted to stream line the process of installing and configuring the base solution for quick deployment I wrote a simple shell script that will do the full install and base config with some end user input. Note this script was written and tested on Fedora and CentOS. To get to work on Ubuntu you will need to replace yum with apt-get and rpm with dpkg. There are a few other minor tweaks in that regards as well. If you get stuck just let me know @genxweb

The script works in the following way.

Download the script: http://www.digitaloffensive.com/files/instabro.sh

  1. Download it and set execute permissions.
  2. Make sure you are root or it will exit and not run.
  3. If a new version of Bro comes out edit the references to the old version in variables and install section.
  4. Execute the script. It will go through a variety of checks.
  5. Depending on the checks it will be installing the dependencies that Bro needs or upgrading them to the newest version.
  6. Next it will download, extract and build Bro.
  7. Once the build process is done it will pause for 30 seconds asking you to check for errors. Please hit ctrl + C if there are any errors, correct the errors and re-run.
  8. If everything was successful you will now have the opportunity to crease a base configuration for Broctl. If you want to do it yourself press ctrl + c here and exit. Otherwise wait 10 seconds and follow next prompt.
  9. Well since you are at step 9 you decided to have us help you do the base config.
  10. Choose your interface to monitor on. If you don’t see any interfaces listed then most likely you need to check your network configuration and try again. If you know your interface and it don’t show just enter it and continue.
  11. Next enter the network to monitor. Note the escape sequence it is telling you to use. If you don’t follow it, it will break.
  12. We will also add broctl to the cron for maint reasons.
  13. Well if you got to this step then you followed the above directions. We are now going to launch the broctl. This will allow you to install the base config and start the Bro IDS system.

Now that it is installed the fun only starts. As I said I am new to Bro IDS and have been reading through all the info I can to get the most out of it as possible. If you have a problem with my script or some other ideas you like to see added hit me up on twitter @genxweb or shoot me a message here.

Posted in Code | Comments (3)

Posted on Monday, 28th January 2013 by Michael

Troubleshooting network issues by graphing network statistics over time.

Recently one of my clients have been having a lot of random disconnects and internet drops since implementing BGP. At random times throughout the day they would notice that a large number of remote users would be disconnected from their remote solution offering and at the same time some internal users would lose internet connectivity. The keyword is some in both scenarios but never all. This led me to believe that at some point we may be having the outside routes change and traffic get dropped as we also started seeing out of state packets on the firewalls.

I came up with the idea if we could run an continues trace route from a source to see if during these issues if we have a fail over of carriers. Basically get a baseline of what a good day looks like then run the trace route to collect information if paths changes and to see what carrier is operating / handling our requests at the time of the failure.

At first I started coding a solution then I stumbled upon a Linux utility called MTR. MTR reads as follows:

“mtr, better than traceroute and ping combined

mtr combines the functionality of the traceroute and ping programs in a single network diagnostic tool.

As mtr starts, it investigates the network connection between the host mtr runs on and HOSTNAME. by sending packets with purposely low TTLs. It continues to send packets with low TTL, noting the response time of the intervening routers. This allows mtr to print the response percentage and response times of the internet route to HOSTNAME. A sudden increase in packet loss or response time is often an indication of a bad (or simply over‐loaded) link.”

The only issue with it is the reporting is lacking. You can run a single report of as many attempts you want but you can’t run it in the background and have it continuously report. To overcome this issue I wrote a simple shell script that will launch the program and have it run for x amount of times then log the results. Then I placed it in the cron to run every minute. The program will check to see if mtr is running and if it is it will not run again. Once it sees it has stopped it will then re-launch it and run for x amount of times again and log. Once it has run a few times we can view the output for issues and try to coordinate it with the problem we are experiencing.

#!/bin/bash

# check mtr

ps -ef | grep -v grep | grep mtr

if [ $? -eq 1 ]

then

echo -e “############`date`############” >> mtr-SERVER.log

             /usr/sbin/mtr –report –report-cycle=1000 xxx.xxx.xxx.xxx >> mtr-SERVER.log &

else

echo “eq 0 – mtr  found – do nothingi >> mtr-running.log”

fi

You want to chance the report-cycle=1000 to the value you want. This is how many traces it will run and log. Next you want to change the xxx.xxx.xxx.xxx to the IP you want to run the traces to or the hostname. Then finally you can change the log name if you want. Make sure you do not use the name mtr in the naming of the script. I called mine check.sh.

Once you edited the script and saved it next you need to put it into the cron. To do this issue the command crontab -e and enter the following

*/10 * * * * /path_to_your_script/check.sh 2>&1 /dev/null

I chose 10 minutes as I noticed running it for a 1000 times takes close to that if not longer, it helps cut down on resource usage.

After a few runs your log will have entries that look like this:

########## Mon Jan 28 09:18:07 EST 2013 ###########

HOST: scanner01                   Loss%   Snt   Last   Avg  Best  Wrst StDev
1.|– xxx.xxx.xxx.xxx              0.0%  1000    0.2   0.3   0.2  63.8   3.1
2.|– aaa.aaa.aaa.aaa                 0.0%  1000    0.2   0.2   0.2  11.6   0.5
3.|– bbb.bbb.bbb.bbb              0.0%  1000    0.3   0.3   0.2  17.8   0

########## Mon Jan 28 09:50:07 EST 2013 ###########

HOST: scanner01                   Loss%   Snt   Last   Avg  Best  Wrst StDev
1.|– xxx.xxx.xxx.xxx              0.0%  1000    0.2   0.3   0.2  63.8   3.1
2.|– aaa.aaa.aaa.aaa                 0.0%  1000    0.2   0.2   0.2  11.6   0.5
3.|– bbb.bbb.bbb.bbb              0.0%  1000    0.3   0.3   0.2  17.8   0

This will allow you to search the logs for the time frame of a incident and to see what the tool has caught if anything.

Hopefully this helps some one else. If you have any questions please feel free to leave a comment.

Posted in Code | Comments (0)

Posted on Monday, 24th December 2012 by Michael

This guide came about from my Christmas tree project where I wanted to control my Christmas tree with my arduino, to shut off and turn on the lights. To do this I decided to create a webserver that would accept requests. These requests would be parsed and based on the input it would control a relay to turn it on or off.This task was simple and we will cover how to do this shortly. Though I could do this from my computer I wanted to be able to do it from anywhere. So I decided to tackle another goal for this year and write my first Android application. This is a simple application that will send the http requests with a click of a button to turn on or off the lights.

Lets look at what is required for hardware to build this.
  • Arduino Uno
  • Arduino Ethernet Shield
  • High voltage relay (I used a Power Switch Tail II)
  • Wireless Bridge (I used a Pocket rocket, china knock off)

Posted in Code | Comments (7)

Posted on Thursday, 8th November 2012 by Michael

I am not one to wear jewelry normally and the thought of having something on my hand for the rest of my life made me a bit nervous. I wanted something that was going to withstand the abuse of my daily life yet look really cool and have a special meaning to me. I also wanted something that was one of a kind.

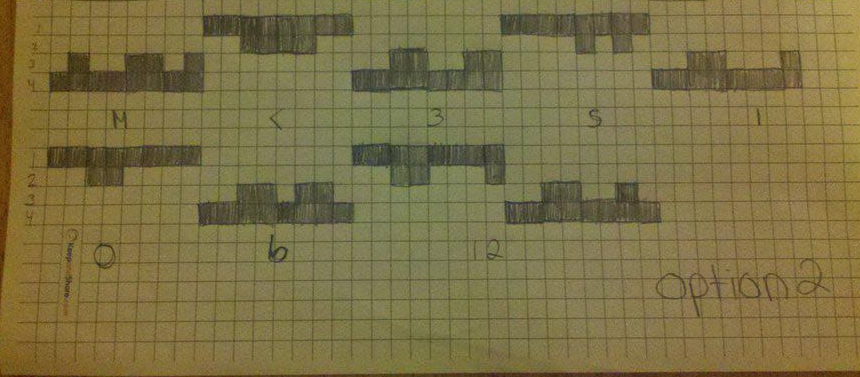
I spent a lot of time viewing rings on line and none of them were jumping out at me. Then one day I was sitting at the jewelers with my then fiancé and it hit me, how about I create a binary wedding ring. I instantly whipped out my smart phone and search Google for binary wedding ring and come up with only two instances of it. The first instance was a very crappy attempt. It was basically a ring with “0110110” going around it.  It looked really generic and cheesy. The second one was a a lot better they used blocks in 3 rows to create a message. Though even using their cheat sheet I could not figure out the meaning, it was not easy for me to decode.

This got me thinking on how to accomplish this, be able to read it, be able to fit it all on a ring and make it look really cool. After a few hours of thinking I printed out a piece of graphing paper (yes printed out a piece J) and decided to use 1 box for a 0 and two boxes for a 1. I also decided to go up and down with the words and have it overlap slightly on the last character to be able to fit it all on the ring.  The final decision was to decide what to put in the binary. For that I decided to put the following message “M <3 S 10612”

The above lead to this:


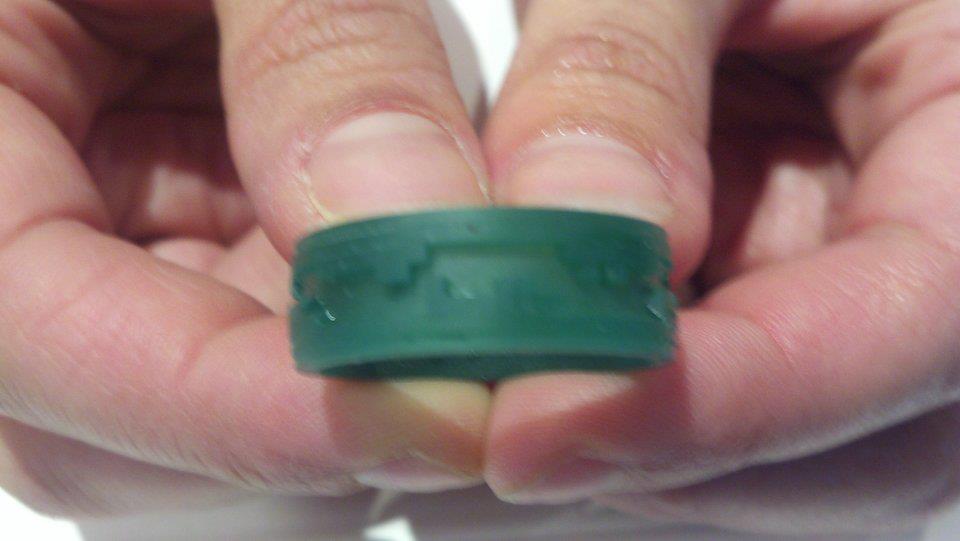
I brought my design to the jeweler and asked if she could do this and after a few weeks she presented me with this wax model of what the ring would look like. After a few tweaks to the design we were ready to move to the casting and making of the ring.


I got to say I was a bit nervous at first as we were getting close to the wire for the ring to be designed and finished. I also designed my wife’s band and had them working on that as well due to her custom engagement band. Though I should have known not to worry as Jessica and the rest of the staff at Finch jewelers came through with flying colors and delivered me a ring that was beyond my expectations. Below are a few images of it, excuse the quality as the ring has not been cleaned in these pictures and it was shot with my cell phone.


Tags: , ,
Posted in Blog | Comments (3)

Posted on Friday, 29th June 2012 by Michael

It has been a while since my last update to the site. Since the last update I have been extremely busy working on several projects and jobs.

http://www.milduino.com : We are developing several products / prototypes currently for scenario training as well as a few general automation tools and controllers. Hopefully by the end of the summer we will have a few products completed and available on the website.

http://www.pahackers.com : This is a local group we started for those that are interested in information security and other types of hacking. The group meets once a month and each month a different topic is presented on or we have an open floor for anyone to ask questions or speak up.

http://www.itsectraining.com:  This site is still in initial thought phase. Our goal is to develop an online training solution for security professionals or those interested in learning about information security. The goal is to offer a curriculum that can be easily adjusted for a majority of the skill sets and have staff available to answer questions and to tutor students that need extra help.

If you would like to get involved with any of the above projects feel free to contact me.

On top of the above projects I have recently accepted an adjunct position at ITT-Tech teaching Windows Server 2008 and developing a Security program as well.  Besides all these side sites, main job, family and consulting I am also still preparing for our wedding.

So in conclusion I apologize for the lack of updates lately to this site.

Posted in Blog | Comments (2)

Posted on Tuesday, 1st May 2012 by Michael

Phishing Attacks and Defense

Recently I was able to speak at the PA Hackers first meet up (http://www.pahackers.com). My topic for this meet up was Phishing Attacks and Defense. I even went as far as to provide a live demo using the SET (Social Engineering Toolkit). The talk had some bugs due to technical issues, but we made it through and the audience enjoyed it. To see the slides from my talk click this link. FINAL-VERSION

Posted in Papers | Comments (0)

Posted on Tuesday, 10th April 2012 by Michael

Back in the spring of 2011 I wrote an addon script to the application iScanner to help automate the process of checking a full website and not just individual pages.  Though over time the ruby programing language has grown and changed a lot to the point that the gems my old script relied on are no longer useable in newer version of ruby.

If it wasn’t for Karen Carter and her research project on iScanner and iScan I would probably never even know there was an issue as I have not visited this code in some time like most things I post about. It is not that I was no longer interested in adding to it or learning how to detect malicious codes in site it was just a matter of time. She contacted me via the site and explained she had an issue using iScan after reviewing her error and reproducing it, I found the issue that I stated above. The recent ruby upgrades made the gem I was using no longer useable.

Though I was not able to rewrite the full code for Karen prior to her presentation I have been able to write a 2.0 beta using faster crawling and scanning. However in the beta reporting is still not great. All results are saved to results.txt and you can use that file to reference the infected files reports and site scan reports, once done make sure to clean up to save space.

To use the new code you will need ruby and the anemone gem installed. Once you have those items you can run the program by typing ruby iscan.rb. You will be prompted for the domain to crawl. Enter the domain and hit enter.

To download the iScan 2.0 beta go to: http://www.digitaloffensive.com/files/iscan2.rb

To read my original write up on this subject go to: http://www.digitaloffensive.com/2011/03/detecting-malicious-code-in-webpages-iscanner-and-iscan-script/

To learn more about iScanner go to: http://iscanner.isecur1ty.org/

To see Karen’s well detailed and educational video on how to use iScanner and iScan go to: http://youtu.be/gxslbpS0R2k

Any questions or concerns feel free to post them below.

Posted in Code | Comments (0)

Posted on Monday, 26th March 2012 by Michael

CCDC the First Hour

Despite some popular beliefs the Blue Cell are not provide machines that already been back doored for the Red Cell to use. The machines that you are giving are definitely built in an insecure method but that’s it.

Your object coming into this event is usually the same year after year. XYZ Company fired their incompetent IT staff. Their incompetence will make your next two days a living hell. You are coming into this organization blind, you do not know nor should you trust the current systems or infrastructure. Though you would like to start from the ground up you need to keep business going and repair the damage while defending an onslaught of attacks.

So how do you get the upper hand? Time is of the essence. The Red Cell is very skilled and some can operate almost as fast as an automated program. That being said when the start bell goes most likely within seconds we have several shells on your machines, plus the default credentials of your web apps, firewall and other devices on the network that year. To get the upper hand I personally believe you need to accomplish this at the network layer as well as working as a team. You need to lock down the firewall as quickly as possible to buy yourself time to CLEAN and remove malicious software, patch systems to avoid re-infection, change your passwords to avoid access, assure there are no new accounts that have been added, trace cables to assure there are no rouge devices and to implement your CCDC game plan.

During this time it is important to remain calm and professional. Remember this is only a game at the end of the day. Though acting in an unprofessional manner will cast a shadow over yourself and school especially since there are many recruiters in the audience watching how you act and respond. These are the people you will be working for if you survive this event and decide that a career in information security is for you.

So how do you lock down your firewall? I am not a CISCO expert by any means though I have had my fair share of time on these devices both in previous jobs and at the CCDC.  First I suggest that if your team has a budget that you look at investing in a CISCO ASA 505 for your schools lab so you can train on it. This is not only good for the competition but is a great training aide as you get ready to enter into the real world, you can say you have CISCO ASA experience. You can find them for a few hundred dollars or less on: http://www.ebay.com/sch/?_nkw=cisco%20asa%205505&clk_rvr_id=326713534867 . Second I suggest you do some reading: http://www.cisco.com/en/US/docs/security/asa/quick_start/5505/5505-poster.html , you have several months to the next CCDC qualifier.

These devices have to main ways to administrate them. The first is through the ASDM software and the second is through command line. The device during the competition is already configured for you saving you a lot of time, but also making you very vulnerable.

  1. Change the default password
  2. Save the changes to the flash and save <= the same as a wr mem at command line. Saving itself will not keep the changes unless you reboot. Saving the changes to the memory will apply instantly avoiding cisco/cisco being used even if you changed the password.
  3. Disable remote administration of your firewall on the outside interface. If the TRUE scorebot needs ssh access then limit it by the TRUE scorebots IP.
  4. Disable any any IP allow and create a policy above it that only allows the ports you need. Make sure you know your basic port numbers
    1. 80 => http
    2. 443 => https
    3. 21 => ftp
    4. 22 => ssh
    5. ICMP => protocol not port
    6. Make sure logging is enabled on your rules and the time on your firewall is correct. This is very important in your incident write ups to show logs and have the time match up. Limited time drift in logs are permissible in court but large discrepancies will be thrown out.
    7. Save your changes to running memory and save.

In the event you are not allowed to block IP addresses without cause nor can you block large ranges of IP addresses. So how do you get the permission to set a block? In the real world this is called a business need. For example:

“Dear Mr.Ceo;

During a recent firewall audit the IT Security department has found that several questionable configurations on the firewall that were left there from the previous IT team. These configurations are opening the organization to undue risk by allowing remote administration of the firewall to any one on the internet. Though we have set the password to properly secured one this doesn’t guarantee full security and it would be wise to lock this feature down to only our remote offices and internal staff.

Sincerely IT Security department”

So now that you are working on locking down your firewall what should the rest of your team be doing? Well that is simple; you have up to 8 team mates that should be accomplishing other tasks while one maybe two people are working on locking down the firewall. This is one reason why the red cell does so well, we break down into teams and divide and conquer.

So how should you divide your team up? I would do it by skill set and the below:

A person or persons working on changing system passwords: these individuals should know basic windows and Linux user account administration. Think about on the Linux system doing away with passwords all together and requiring the use of ssh keys.

A person or persons working on web applications: Make sure they know where each application is located. Make sure not only the administrator passwords are changed but all user passwords are changed. Think about having these team mates lock down admin directories to only internal IP ranges by using .htacess files or another method.

A person or persons working on identifying and disabling services: Make sure that you know what is running. Verify that what is running is required and if it is not required then disable it. This user should know how to use services.msc on windows and /etc/services in Linux as well as service blank stop or start.

A person or persons working on applying system patches: Have them focus on remotely exploitable patches first then other patches. Since the firewall should be locked down now exploits like smb will not be as high of a risk.

A person or persons tracing wires and securing wireless: Make sure you know what is plugged into your network and where each wire goes into. WEP is not your friend. It sucks when your IT department comes in that night and rewires things for you and adds devices for your job to work better J

A person or persons monitoring connections and logs: this person should be familiar with the tool tcpview, netstat and log reading. They will be the one that should help detect intrusions and gather evidence for the incident response.

A person or persons working on business injects: Even though there is a threat to your environment, business needs to remain running. Make sure it gets done or you will be done.

If you have any additional people that are not physically working on a box have them become the note takers, document what you have done. Or you can make them a gopher to go get coffee or other supplies. The team captain should be this person. They should act as a manager and supervise dictate and control. They are there to execute your teams plan and keep you guys coordinated and motivated.

This may seem like a lot and not able to be accomplished in an hour, but it can. You will need to run in parallel with each other and multitask. If you have questions please feel free to contact me and remember to reach out to the Red Cell members for help and input throughout the year.

Posted in CCDC | Comments (0)

About Consulting Store